
CONTAINER ID	IMAGE
c031860c837e	sonatype/nexus:2.14.4-03
(returns a wealth of JSON data)
__ID__/g' -e 's|:/|\n\t /|g' -e 's/^ {16}//'__ID__"LowerDir": "/var/lib/docker/overlay2/__ID__-init/diff /var/lib/docker/overlay2/__ID__/diff /var/lib/docker/overlay2/__ID__/diff /var/lib/docker/overlay2/__ID__/diff /var/lib/docker/overlay2/__ID__/diff /var/lib/docker/overlay2/__ID__/diff", "MergedDir": "/var/lib/docker/overlay2/__ID__/merged", "UpperDir": "/var/lib/docker/overlay2/__ID__/diff",
volumeto refer both to volumes and to bind mounts, which makes things even harder for newbies
storage for data to persist between runs, anonymous volumes are not suited for this purpose.
As opposed to bind mounts, all options for volumes are available for both --mount and -v flags., which translates to :
all options for volumes are available for both --mount and -v flags: you may define a volume using either --mount or --volume, you'll have access to the same options
As opposed to bind mounts,: it's the contrary for bind mounts : "not all options are available for both --mount and -v flags" (... and they let us guess ??? )
| bind mount | volume | ||
|---|---|---|---|
| anonymous | named | ||
| CLI |
-v /path/on/host:/path/in/container
If the 1st parameter has one or more
/ (e.g. /path/on/host) :
|
-v path/in/container
|
|
| Dockerfile | You can't (details) :
|
VOLUME path/in/container
|
You can't. Otherwise, 2 containers instantiated from the same image would try to create 2 volumes with the same name, which is not possible (details : 1, 2). |
| docker-compose.yml | version: '3.7'
services:
db:
volumes:
- ./db:/var/lib/mysql
web:
volumes:
- ./web:/var/www/html
(source)
|
version: '3.1'

services:

  drupal:
    image: drupal:8.2-apache
    ports:
      - 8080:80
    volumes:
      - /var/www/html/modules
      -
(source)
|
version: "3"

services:
  db:
    image: db
    volumes:			#1 use the named volume
      - myvol:/var/lib/db	myvol created with #3

  backup:
    image: backup-service
    volumes:			#2 use the named volume
      - myvol:/var/lib/backup	myvol created with #3

volumes:			#3 create the named
  myvol:			volume myvol
In this example, the database's data directory is shared with another service as a volume so that it can be periodically backed up.
(sources : 1, 2)
|
ADD [--chown=kevin:developers] source destination
ADD or COPY ?ARG and ENV-defined variables ?
ARG myVariable
ARG must not appear before FROM$ prefix (like shell variables, source) :
ARG myVariable=42
RUN echo $myVariable
COPY files into an existing directory :
COPY someFile /path/to/destinationDir
COPY someFile /path/to/destinationDir/
ENV key=value sets the environment variable key to the value valueENV will persist when a container is run from the resulting imageENV-defined variables is that (source) :
ENV is for run-time variable. These are for variables that have to exist while a container runs.EXPOSE portNumber states that something inside the container is listening on port portNumber.FROM (Understand how ARG and FROM interact)AS newName can be specified to refer to this new build stage in a subsequent FROMFROM baseImage [AS newName]FROM baseImage:tag [AS newName]RUN, CMD and ENTRYPOINT instructions that follow it in the DockerfileVOLUME /dataVOLUME /volume1 /volume2VOLUME [ "/data" ]VOLUME [ "/volume1", "/volume2" ]VOLUME /dir1 /dir2 :
/, VOLUME /data and VOLUME data may/may not refer to the same thing depending on circumstancesRUN, CMD, ENTRYPOINT, COPY and ADD instructions that follow it in the DockerfileWORKDIR doesn't exist, it will be created even if it's not used in any subsequent Dockerfile instruction.
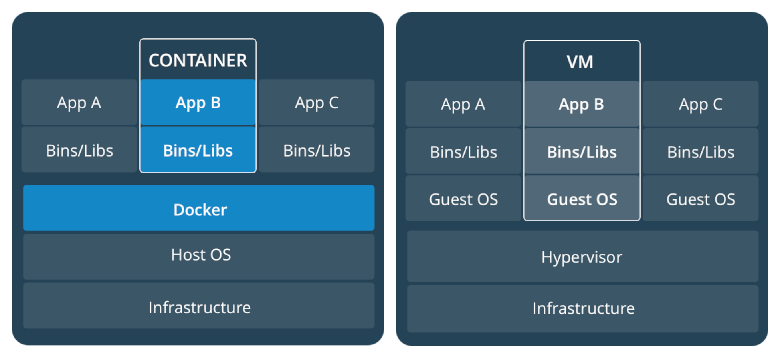
as ifwe were provisioning VMs + playing with them + destroying them when the test is over (this is actually what I've tried to achieve here). It is especially nice to play with software without breaking things.
Looks like both would fit pretty well with each other. So what's the problem ?
stable/ magic, hyperlinks below are not dead, but they don't point to the same information at all.Types: deb URIs: https://download.docker.com/linux/debian Suites: $(. /etc/os-release && echo "$VERSION_CODENAME") Components: stable Architectures: $(dpkg --print-architecture) Signed-By: /etc/apt/keyrings/docker.ascEOF
Types: deb
URIs: https://download.docker.com/linux/debian
Suites: bookworm
Components: stable
Architectures: amd64
Signed-By: /etc/apt/keyrings/docker.asc
Unable to find image 'hello-world:latest' locally		you can safely ignore this line since it's the 1st launch
latest: Pulling from library/hello-world
0e03bdcc26d7: Pull complete
Digest: sha256:e7c70bb24b462baa86c102610182e3efcb12a04854e8c582838d92970a09f323
Status: Downloaded newer image for hello-world:latest

Hello from Docker!
This message shows that your installation appears to be working correctly.

To generate this message, Docker took the following steps:
 1. The Docker client contacted the Docker daemon.
 2. The Docker daemon pulled the "hello-world" image from the Docker Hub.
    (amd64)
 3. The Docker daemon created a new container from that image which runs the
    executable that produces the output you are currently reading.
 4. The Docker daemon streamed that output to the Docker client, which sent it
    to your terminal.
For the impatientsprocedure, see the source documentation for details
mountedinto a container
VOLUME in Dockerfilevolumes in docker-compose.ymlCONTAINER ID IMAGE COMMAND CREATED STATUS PORTS NAMES
f64391d2ae1b atlassian_confluence "./entrypoint.sh" 5 days ago Up 4 days 0.0.0.0:8090-8091->8090-8091/tcp atlassian_confluence_1
	"Type": "volume",
	"Name": "atlassian_confluence_tmp",
	"Source": "/var/lib/docker/volumes/atlassian_confluence_tmp/_data",
	"Destination": "/tmp",
	"Driver": "local",
	"Mode": "rw",
	"RW": true,
	"Propagation": ""
--
	"Type": "volume",
	"Name": "atlassian_confluence_data",
	"Source": "/var/lib/docker/volumes/atlassian_confluence_data/_data",	the Source is inside the container (see Mountpoint below)
	"Destination": "/var/atlassian/application-data/confluence",		the Destination is on the host
	"Driver": "local",
	"Mode": "rw",
	"RW": true,
	"Propagation": ""
[
	{
		"CreatedAt": "2020-10-08T23:09:51+02:00",
		"Driver": "local",
		"Labels": {
			"com.docker.compose.project": "atlassian",
			"com.docker.compose.version": "1.21.2",
			"com.docker.compose.volume": "confluence_data"
		},
		"Mountpoint": "/var/lib/docker/volumes/atlassian_confluence_data/_data",
		"Name": "atlassian_confluence_data",
		"Options": null,
		"Scope": "local"
	}
]
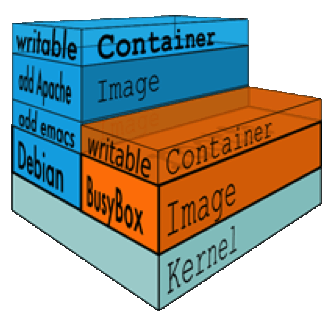
sees/ contains everything inside the container from file system to processes etc. You can issue a ps on the host and see processes running inside the container (source).
Docker Root Dir'Docker Root Dir: /var/lib/docker
REPOSITORY		TAG		IMAGE ID		CREATED			SIZE
whatever/myImage	latest		e00a21e210f9		22 months ago		19.2MB
(Lower|Merged|Upper|Work)Dir' | sed 's|/var|\n/var|g'"LowerDir": " /var/lib/docker/overlay2/9ceb16316d05119812856edda1c772b3680ff20336859cb79e8d58df8abf787a/diff: /var/lib/docker/overlay2/ac535e1ef985bec3d5bc90a5124f4ca14a610b9f007966f7521496aa6b6866ac/diff: /var/lib/docker/overlay2/4eeff3b3fc7a14b197827ffae0cab33c0df6a15b08b2f45895c6e987a6f3013a/diff", "MergedDir": " /var/lib/docker/overlay2/6923b6f343bd98e0a05826de6794dcb1756b4eb5fad9811fcad773e76b66a737/merged", "UpperDir": " /var/lib/docker/overlay2/6923b6f343bd98e0a05826de6794dcb1756b4eb5fad9811fcad773e76b66a737/diff", "WorkDir": " /var/lib/docker/overlay2/6923b6f343bd98e0a05826de6794dcb1756b4eb5fad9811fcad773e76b66a737/work"