GNU/Linux Debian - The universal operating system

mail

How to extract a Debian .deb package ?

method 1 :

  1. ar -x packageName.deb
  2. you'll get several compressed archives, either in gzip or xz format. Anyway, tar is smart enough to identify the format and use the appropriate program to uncompress :
    tar -xf data.tar.xz

method 2 :

dpkg-deb -xv packageName.deb
mail

Missing firmware during Debian install

While installing Debian (any version), it is very likely that you encounter the "missing firmware" screen :
The procedure below applies to Intel WiFi card firmware but may work to any kind of hardware.
  1. find and download the .deb containing the required firmware (here : Intel WiFi firmware-iwlwifi_20190114-2_all.deb)
  2. extract the .deb
    The required files are lib/firmware/iwlwifi-8000C-??.ucode
  3. prepare an extra storage media, either on a separate USB key or as an extra partition on the USB key you're using to install, with fdisk :
    1. new partition
    2. size : 64MB (not too big because it'll be formatted as FAT16, which doesn't support large disks of today )
    3. partition type : 6
    4. mkfs.fat /dev/sdxn
  4. copy the iwlwifi-8000C-*.ucode files extracted earlier to the root of this new partition (you'll see later why it matters)
  5. re-start the Debian installer and run it until it complains about missing firmware and offers to load them from a different source
  6. switch to another console with Ctrl-Alt-F2
  7. plug the USB key containing the firmware files and identify it with blkid (which gave : /dev/sdc1)
  8. mkdir -p /lib/firmware
  9. mount /dev/sdc1 /lib/firmware
    this is why it was important to copy files at the root of the new partition : you can now see them with
    ls /lib/firmware/iwlwifi*
  10. return to the Debian installer with Ctrl-Alt-F1
  11. Load firmware from another source ? answer Yes
  12. the Debian installer should detect network interfaces (wired / WiFi / bluetooth / broadband / ) and continue normally

Alternate solution

Install Debian using an unofficial non-free image including firmware packages.
mail

/etc/apt/sources.list

Format (source) :

Each line is made of several fields :
deb http://ftp.fr.debian.org/debian/ buster main contrib non-free
  1. deb : archive type. Either :
    • deb : binaries
    • deb-src : source
  2. http://ftp.fr.debian.org/debian/ : repository URL
  3. buster : distribution. Either :
  4. main, contrib, non-free : components aka repositories

Repositories (source) :

Debian packages cycle

stable-proposed-updates (source) :

  • point releases are minor distribution releases, like the version 10.8 for Buster.
    NB : minor must be taken in the x.y.z version numbering meaning, not low importance
  • stable-proposed-updates is :
    • an apt repository that contains the files that are being prepared for the next point release. This repository is fed by the proposed-updates mechanism.
    • a link to the current stable distribution updates : buster-proposed-updates
  • stable-proposed-updates :
    • isn't a standalone repository
    • only contains the subset of packages that are going to be updated
    which is why you should have both stable and stable-proposed-updates repositories enabled.

stable-updates (source) :

  • Some packages from proposed-updates may also be made available via the stable-updates mechanism. This path will be used for updates which many users may wish to install on their systems before the next point release is made, such as updates to virus scanners and timezone data.
  • All packages from stable-updates will be included in point releases.
The stable-updates term applies both to :
  • the update mechanism
  • the resulting repository

Who can explain this ?

deb	http://deb.debian.org/debian-security/	buster/updates	main contrib non-free
deb	http://deb.debian.org/debian		buster-updates	main contrib non-free
mail

DBus.Error:org.freedesktop.DBus.error.ServiceUnknown: The name org.freedesktop.Accounts was not provided by any .service files

Situation

I got this on a Debian Buster guest, in the context of a bug with VirtualBox and LightDM..

Details

The fix below doesn't solve the problem with VirtualBox, but at least, makes the line disappear from the log...

Solution

apt install accountsservice
mail

E: Could not get lock /var/lib/dpkg/lock-frontend - open (11: Resource temporarily unavailable)

Situation

root@myComputer ~$ apt upgrade
E: Could not get lock /var/lib/dpkg/lock-frontend - open (11: Resource temporarily unavailable)
E: Unable to acquire the dpkg frontend lock (/var/lib/dpkg/lock-frontend), is another process using it?
root@myComputer ~$ ll /var/lib/dpkg/lock-frontend
-rw------- 1 root root 0 Sep  9 08:09 /var/lib/dpkg/lock-frontend		today, a couple minutes ago
root@myComputer ~$ rm /var/lib/dpkg/lock-frontend
root@myComputer ~$ apt upgrade
E: Could not get lock /var/lib/dpkg/lock - open (11: Resource temporarily unavailable)
E: Unable to lock the administration directory (/var/lib/dpkg/), is another process using it?

Details

I started seeing this error message after upgrading to Debian Buster. Could that be a bug in a new system utility ?

Solution

This is actually unattended upgrades being processed. There is nothing special to do, don't even bother with these lock files : they MUST NOT be deleted (otherwise —like everytime doing rm on system stuff as root— things may break BAD !)
Just sit and relax while your computer is being automatically updated. You don't even need to run apt update && apt upgrade manually now
mail

Debian Stretch : how to install openssh-client version >= 7.7 ?

Situation

I'm in a situation where I'd like to use openssh-client's BindInterface configuration directive, which is not available in my current openssh-client version (details in preceding "BindInterface" hyperlink) :
dpkg -l openssh-client
||/ Name                 Version         Architecture    Description
+++-====================-===============-===============-=============================================
ii  openssh-client       1:7.4p1-10+deb9 amd64           secure shell (SSH) client, for secure access

Details

openssh-client is available at version 7.9 in the testing repository (source), so let's install this one.

Solution

All commands below are run as root (or with the appropriate sudo prefix).
  1. echo 'deb http://http.us.debian.org/debian testing main' >> /etc/apt/sources.list
  2. apt update
  3. apt search openssh-client
    Sorting... Done
    Full Text Search... Done
    openssh-client/testing 1:7.9p1-10 amd64 [upgradable from: 1:7.4p1-10+deb9u6]
    	secure shell (SSH) client, for secure access to remote machines
    
    
  4. not tested yet :
    apt install openssh-client
  5. comment the line added to /etc/apt/sources.list so that further packages won't come from testing.
mail

How to reconfigure locales on Debianoids ?

The "easy" method :

Just execute dpkg-reconfigure locales as root and follow the on-screen instructions.

The "hard" method :

  1. edit /etc/locale.gen
  2. then launch locale-gen
Changes will be applied :
  • after the next reboot
  • or right after running (source) :
    . /etc/default/locale
mail

How to disable the automount of USB drives on Debianoids ?

Situation

Every time I plug a USB drive, it's automatically mounted, which pops up the file manager :

Details

Solution

You can disable + re-enable the automount of USB drives with (source) :
  1. systemctl stop udisks2.service
  2. systemctl start udisks2.service
Should you wish to make this reboot-proof, consider disabling this service.

Alternate solution

You may also use dconf-editor to do so (source) :
  1. install it :
    apt install dconf-editor
  2. run it :
    dconf-editor
  3. browse the tree to : org | your desktop manager | desktop | media-handling
  4. switch off the Automount option
  • this is the graphical version of this solution
  • this solution (either CLI or graphical) sometimes doesn't work for unknown reasons so far

Solution

Below is the full trial-and-error process of my initial investigations on Debian 8. This is mostly made of things that don't work, but which may help for future / related investigations

Read the solution.

Here are all the solutions I tried that failed :

So far, the winner is (inspired by) :

gsettings set org.mate.media-handling automount-open false
gsettings set org.mate.media-handling automount false
I've already edited this article several times because the "solutions" I found didn't survive a graphical logout/login or a reboot. So let's keep our fingers crossed with this one

Some extra notes :

mail

Some processes that caught my attention for a reason...

NetworkManager :

I noticed it because ...

  • eats up to 75% of a CPU
  • makes no difference on network activity before/after killing it
  • comes with his buddy nm-applet

Normal task :

Manage connections and report network changes (details). This has little to no interest in stable network environment such as a desktop computer.

Solution :

systemctl stop NetworkManager && systemctl disable NetworkManager && kill -15 $(pidof nm-applet)

The gvfs family :

I noticed it because ...

  • They are legion : ps aux | grep gvfs
    stuart	9326	0.0	0.0	209840	4264	?	Sl	2015	0:00	/usr/lib/gvfs/gvfsd
    stuart	9363	0.0	0.1	451864	8200	?	Sl	2015	0:24	/usr/lib/gvfs/gvfs-udisks2-volume-monitor
    stuart	9369	0.0	0.0	300240	4372	?	Sl	2015	0:00	/usr/lib/gvfs/gvfs-afc-volume-monitor
    stuart	9381	0.0	0.0	206556	4124	?	Sl	2015	0:00	/usr/lib/gvfs/gvfs-mtp-volume-monitor
    stuart	9385	0.0	0.0	215636	4156	?	Sl	2015	0:00	/usr/lib/gvfs/gvfs-gphoto2-volume-monitor
    stuart	9390	0.0	0.0	202568	3912	?	Sl	2015	0:00	/usr/lib/gvfs/gvfs-goa-volume-monitor
    stuart	9408	0.0	0.1	416220	10040	?	Sl	2015	1:31	/usr/lib/gvfs/gvfsd-trash --spawner :1.11 /org/gtk/gvfs/exec_spaw/0
    stuart	11057	0.0	0.1	135000	12016	?	Sl	2015	1:09	/usr/lib/gvfs/gvfsd-metadata
  • randomly (?) eating 100% of a CPU core
  • permanently consuming disk I/O (SSD killer ?) and making disks slow

Normal task :

https://en.wikipedia.org/wiki/GVfs

Solution :

This is a quick'n'dirty solution. Use at your own risk !

for gvfsProcess in $(ps aux | grep "[g]vfs" | awk '{print $11}'); do echo "$gvfsProcess"; chmod -x "$gvfsProcess"; kill -15 $(pidof "$gvfsProcess"); done

Actually, doing this to all the gvfs processes breaks the desktop trash functionality (and shows an ugly "grep | awk" ). To let it work, leave /usr/lib/gvfs/gvfsd unaltered, which will in turn start /usr/lib/gvfs/gvfsd-trash.
Improved version :

for gvfsProcess in $(ps aux | awk '$11 ~ /gvfs/ && $11 !~ /(gvfsd|trash$)/ {print $11}'); do echo "$gvfsProcess"; chmod -x "$gvfsProcess"; kill -15 $(pidof "$gvfsProcess"); done

modem-manager / ModemManager (1, 2) :

I noticed it because ...

There is no modem to manage.

Normal task :

ModemManager is a DBus-activated daemon which controls mobile broadband (2G/3G/4G) devices and connections. Whether built-in devices, USB dongles, Bluetooth-paired telephones, or professional RS232/USB devices with external power supplies, ModemManager is able to prepare and configure the modems and setup connections with them.
Whether ModemManager.service is enabled or not seems to make no difference to use my smartphone to connect to the Internet.

Solution :

Read this.

tumblerd :

I noticed it because ...

Eating CPU (1 core)

Normal task :

XFCE-specific, D-Bus service for applications to request thumbnails (source).

Solution :

  • kill -1 $(pidof tumblerd)
  • apt remove tumbler
mail

How to install Debian from a USB flash drive ?

The .iso image file :

The 1st thing you'll need is an ISO image of the installation media. Debian offers many different images (CD / DVD / minimum / network / ...). I usually install from a Network install from a minimal CD, meaning I have to download a minimal installation bootable CD (~250MB), boot from it to start the installation process (pick language, partition hard drives, ...), then download the software packages I've selected during install.
These images are designed to be burnt on a CD and used as a boot media, don't forget to check file integrity before going further.

Debian .iso images are hybrid images : they are designed to boot from a CD / DVD or from a USB flash drive simply by "pushing" them to a storage + boot media.
A standard image can be converted into an hybrid one with isohybrid (sources : 1, 2) :

apt install syslinux-utils && isohybrid image.iso && dd if=image.iso of=/dev/sdz

Preparing the USB flash drive :

  1. identify the USB drive
    Whatever is listed at this step, we need to deal with the device itself, not with a volume on this device : if it says /dev/sdz1, the device we'll write to is /dev/sdz.
  2. make sure the USB drive is not mounted
  3. transfer the .iso to the USB drive. There are several methods to do so :
  4. make sure no data is stuck in a buffer : sync
  5. you can now safely unplug the USB drive and boot from it

Booting from the USB flash drive :

This looks like the easiest part, but ...

Never underestimate the ability of simple things to miserably fail .
My motherboard, like ALL motherboards in the world (well, its BIOS setup, actually) has a Boot device priority setting, in which I can enable/disable/reorder items like Hard Disk Drive, Optical Disc Drive, Network or Removable Media.
Since my USB flash drive is both a media and removable, I've set Removable Media as the 1st boot option, and moved Hard Disk Drive as the 2nd option, plugged the key, then boot. It boots from the hard drive (). Retry, no change .

I completely removed Hard Disk Drive from the boot devices and tried again : Operating system not found. Insert a proper boot media and press a key or GTFO. At that point, I thought I made something wrong while transferring the image to my USB flash drive, so I started that step again (and again, and again, and one more time after that. Which is why I'm not sure about the "dd-only" method above).

...

Finally, it appears that, in the BIOS setup of my motherboard, a USB flash drive is not considered as a Removable Media but as a Hard Disk Drive. But, in order to boot from a USB flash drive, you have to plug it prior to entering the BIOS setup, enable Hard Disk Drive boot, then select the detected USB device as the 1st boot device in the HDD boot priority menu.

Missing firmware :

It is very likely that, upon discovering hardware, the setup program detects some missing firmware(s) :
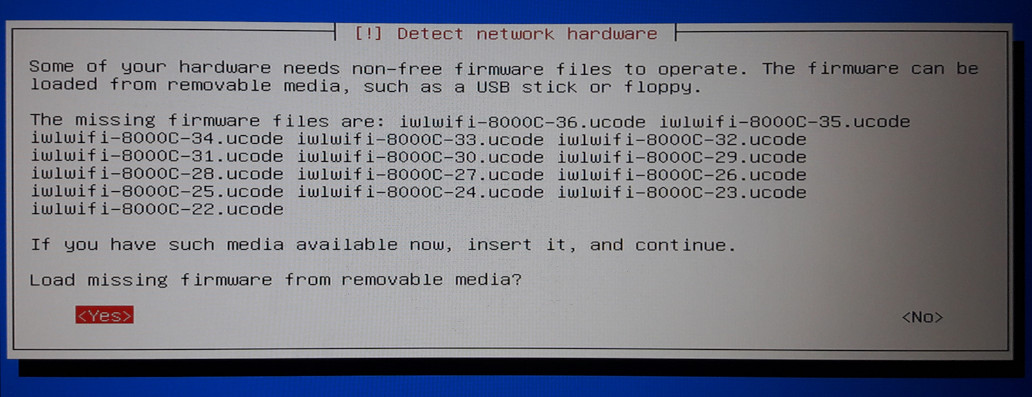
Hardware needs non-free firmware to run, missing firmwares are: rtlwifi/rtl8192sefw.bin
Please refer to my dedicated article : Missing firmware during Debian install.
mail

Debian backports

Backports are recompiled packages from testing (and sometimes from unstable) to stable so that they can run without new libraries (whenever possible). To use a backport, you'll have to :
  1. declare it in the /etc/apt/sources.list
  2. install from backports

Update /etc/apt/sources.list :

For Wheezy :
  1. echo deb http://http.debian.net/debian wheezy-backports main >> /etc/apt/sources.list
  2. apt update

Search packageName in backports :

apt -t stretch-backports search packageName

Install packageName from backports :

apt -t wheezy-backports install packageName
mail

Debian repositories

Official repositories :

stable (currently aliased wheezy, version 7)
The current release that has stable and well-tested software. stable is made by freezing testing for a few months where bugs are fixed to make the distribution as stable as possible; then the resulting system is released as stable.
backports
This repository provides more recent versions than stable for some software. It is mainly intended for users of stable who need a newer version of a particular package.
testing (currently aliased jessie, version 8)
Will be the next major release and is currently being tested. It contains more modern packages than stable but older than unstable.
unstable (permanently aliased sid)
Contains packages currently under development; it is updated continually. This repository is designed for Debian developers who participate in a project and need the latest libraries available, or for those who like to "live on the edge", so it will not be as stable as the other distributions.
oldstable (currently aliased squeeze, version 6)
The prior stable release.

How packages flow between archives (source) :

Debian packages cycle

Non-free and Unofficial repositories (source) :

main
packages that are released under a free license (BSD, GPL, etc.) and that meet the DFSG.
contrib
Packages which do comply with the DFSG, but may fail other requirements (e.g., they may depend on packages which are in non-free or require such for building them).
non-free
Packages that do not comply with the DFSG. These packages have some strict license conditions that restrict the usage and redistribution of the software.
Third-party
Not part of the Debian Project, they are maintained by third party organizations.
mail

How to create a .deb package ?

The impatients may follow this tutorial (or read the local copy).

Structure of a .deb package :

Many packages are cached in /var/cache/apt/archives/. You can extract the contents of a package with :

ar -x packageName.deb

Once you've extracted the contents of a package, you'll see that it basically contains :

  • control.tar.gz :
    • control : package meta-data
    • preinst : pre-installation script
    • postinst : ...
    • prerm
    • postrm
  • data.tar.gz : this is the actual payload of the package. It mimics the Linux file structure where something has to happen during install
  • debian-binary : this only contains the string 2.0, stating the version of the packaging system (this is approximate !!!)

As a good practice, it is wise to backup all modified files into /opt/packageName, so that they can be restored upon uninstall of the package.

Build the package

  1. your package building environment should look like /path/to/workdir/packageBuildingRootDirectory/myPackage
  2. myPackage should be named after : name-version (see naming rules)
  3. cd /path/to/workdir/packageBuildingRootDirectory/
  4. build : dpkg -b myPackage
  5. you should get : /path/to/workdir/packageBuildingRootDirectory/myPackage.deb

Install the package

  1. copy myPackage.deb to the destination host
  2. launch installation : dpkg -i myPackage.deb
  3. If any other package is required by myPackage and is missing, it'll be flagged for further installation. Run apt-get install -f to install it.
  4. myPackage will be installed automatically after that.