
Due to common corporate firewall rules, sshd is listening on TCP port 443 on your server. This is fine until you decide to enable TLS (i.e. HTTPS), because both SSH and your web server require access to the TCP port 443.
Here comes sslh, allowing to share the TCP port 443 between :
22 or any other port
:443tcp LISTEN 0 0 my.public.IP.address:443 *:* users:(("sslh",pid=7330,fd=3),("sslh",pid=7328,fd=3))
127.0.0.1:22.
ListenAddress 127.0.0.1
Port 22
iptables -I INPUT -p tcp -d 127.0.0.1 --dport 22 -m state --state NEW -m recent --set
iptables -I INPUT -p tcp -d 127.0.0.1 --dport 22 -m state --state NEW -m recent --update --seconds 60 --hitcount 3 -j DROP
configure the webserver so that it listens on 127.0.0.1:443 instead of 0.0.0.0:443


You can check it locally with : ping 127.0.0.1
| number of hosts | Address class | Network Id | Subnet Mask |
|---|---|---|---|
| n < 255 | class C | from 192.168.0.0 to 192.168.255.0 | 255.255.255.0 |
| 255 < n < 65535 | class B | from 172.16.0.0 to 172.31.0.0 | 255.255.0.0 |
| n > 65535 | class A | 10.0.0.0 | 255.0.0.0 |
# The loopback network interface
auto lo
iface lo inet loopback
# The primary network interface
auto eth0
allow-hotplug eth0
iface eth0 inet static
	address 192.168.0.254
	netmask 255.255.255.0
	network 192.168.0.0
	broadcast 192.168.0.255
	gateway 192.168.0.1
# The primary network interface
auto eth0
allow-hotplug eth0
iface eth0 inet dhcp
auto wlan0
iface wlan0 inet dhcp
	wireless-essid myEssid
	wireless-key myWepKey
Don't forget to restart the networking management : /etc/init.d/networking restart
127.0.0.1	localhost
192.168.0.1	foo.bar.baz	foo
SSH_CLIENT and SSH_TTY variables are set
IP address. What does this mean ?
                    binary                                  decimal
host address        11000000.10101000.01100100.01111011     192.168.100.123
subnet mask         11111111.11111111.11111000.00000000     255.255.248.0
                    |<------21 bits------>|
host address AND subnet mask to get the subnet address :
                    binary                                  decimal
host address        11000000.10101000.01100100.01111011     192.168.100.123
    AND
subnet mask         11111111.11111111.11111000.00000000     255.255.248.0

subnet address      11000000.10101000.01100000.00000000     192.168.96.0
1
                    binary                                  decimal
subnet address      11000000.10101000.01100000.00000000     192.168.96.0
subnet mask         11111111.11111111.11111000.00000000     255.255.248.0
                                           |<--host-->|
broadcast address   11000000.10101000.01100111.11111111     192.168.103.255
(check it )
                    binary                                  decimal
host address        aaaaaaaa.bbbbbbbb.cccccccc.00101000     10.27.25.40
subnet mask         11111111.11111111.11111111.11100000     255.255.255.224
                    |<----------27 bits--------->|

subnet address      aaaaaaaa.bbbbbbbb.cccccccc.00100000     10.27.25.32		host address AND subnet mask
broadcast address   aaaaaaaa.bbbbbbbb.cccccccc.00111111     10.27.25.63		subnet address with host bits set to 1


CLOSE_WAIT means that the local end of the connection has received a FIN from the other end, but the OS is waiting for the program at the local end to actually close its connection.
Having plenty of CLOSE_WAIT is caused by a program running on the local machine not closing the socket. It is not a TCP tuning issue. A connection can (and quite correctly) stay in CLOSE_WAIT forever while the program holds the connection open. It's the responsibility of an application (i.e. not to the OS) to close its socket once the remote computer closes its side of the TCP communication.
Once the local program closes the socket, the OS can send the FIN to the remote end which transitions you to LAST_ACK while you wait for the ACK of the FIN. Once that is received, the connection is finished and drops from the connection table.
If you are seeing a large number of connections persisting in CLOSE_WAIT state it's probably a problem with the app itself : connections have been torn down but your side of things still has a file descriptor open.
Solutions :
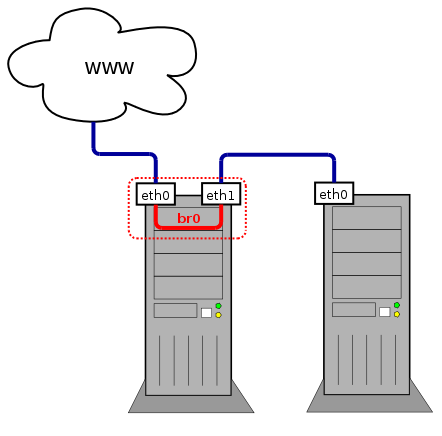
# The loopback network interface
auto lo br0
iface lo inet loopback

# Set up interfaces manually, avoiding conflicts with, e.g., network manager
iface eth0 inet manual
iface eth1 inet manual

# Bridge setup
iface br0 inet dhcp
	bridge_ports eth0 eth1
# The loopback network interface
auto lo br0
iface lo inet loopback

# Set up interfaces manually, avoiding conflicts with, e.g., network manager
iface eth0 inet manual
iface eth1 inet manual

# Bridge setup
iface br0 inet dhcp
	bridge_stp	off		# disable Spanning Tree Protocol
	bridge_waitport	0		# no delay before a port becomes available
	bridge_fd	0		# no forwarding delay
	bridge_ports	none		# if you do not want to bind to any ports
	bridge_ports	regex eth*	# use a regular expression to define ports
Non-authoritative answer:
Name:		xn--kda9ag6e8jma6nxjsa.pl
Address:	46.29.20.204
PING xn--kda9ag6e8jma6nxjsa.pl (46.29.20.204) 56(84) bytes of data.
64 bytes from s1.dnsprotect.eu (46.29.20.204): icmp_req=1 ttl=43 time=122 ms

--- xn--kda9ag6e8jma6nxjsa.pl ping statistics ---
1 packets transmitted, 1 received, 0% packet loss, time 0ms
rtt min/avg/max/mdev = 122.774/122.774/122.774/0.000 ms
| On Debianoids | On Red Hatoids | On both | |
|---|---|---|---|
| Where are they stored ? |
Network Manager ignores these files (details).
|
|
DNS resolution is configured in /etc/resolv.conf |
| To load changes : | systemctl restart networking | systemctl restart network | |
| How to change the hostname ? |
|
Proxy settings are saved in /etc/profile or /etc/environment (system-wide settings) or in ~/.bashrc (personal settings including proxy credentials) :
export http_proxy="http://proxyUser:proxyPassword@proxyHost:proxyPort/"
export https_proxy=$http_proxy
export ftp_proxy=$http_proxy
After editing one of these files, reload it : source theFileIJustEdited
All fields (and especially the password) must be url-encoded.
| Function | Windows command | Linux command | FreeBSD command | Details |
|---|---|---|---|---|
| get the MAC address matching a known IP address | arp -a | arp IP_address | ||
| display the whole content of the ARP table | arp -a | arp -a | ||
| flush the whole content of the ARP table | arp -d | (not possible ?) | arp -a -d | |
| flush one host from the ARP table | arp -d IP_address | |||
| set a static record in the ARP table | arp -s IP_address MAC_address | On Windows, the MAC address is in the format xx-xx-xx-xx-xx-xx |
ip neigh show | grep '192.168.105.128'
Here's an example hping command line :
hping -S -p ++1 target --fast | grep "SA"
| Parameter | Usage | Details / Example |
|---|---|---|
| -a IP_address | spoof IP_address | tell the target host that packet are from IP_address |
| -A | toggle the ACK flag | |
| -c n | count : send n packets | |
| -d n | send n bytes of data |
|
| -F | toggle the FIN flag | |
| -k | keep source port | This is to be used with the -s option to prevent hping from incrementing the source port. |
| -p x | set x as destination port |
|
| -R | toggle the RST flag | |
| -s x | set x as source port | By default, hping uses a random port as its source port and increases it after each packet sent. This can be overridden with the -s and -k options. |
| -S | toggle the SYN flag |
| Goal | Details | Command line |
|---|---|---|
| Ensure a given TCP port is open | Let's send a SYN packet to the HTTP port of the host target (1 packet is enough). Based on the TCP three-way handshake, an open port will reply with a SA-flagged packet. | hping -S -p 80 c200 -c 1 |
| Ensure a Windows host is up | On many Windows hosts, some ports (Netbios - 139, portmapper - 135, among many others) are often left open. Any reply shows the host is up. SA shows the connection is allowed. RA shows the connection is refused. This technique isn't 100% reliable. If the target port is firewalled with a DROP rule, there'll be no answser.
|
hping -S -p 135 c200 -c 1 |
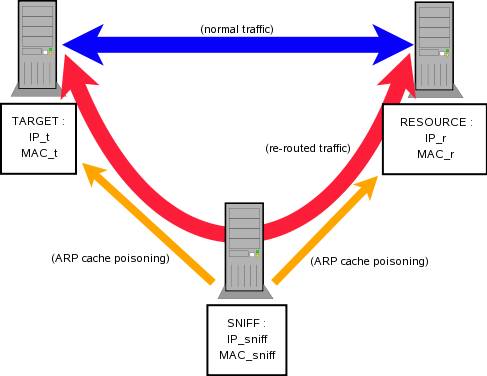
Before going further, make sure you understand the basics of ARP. If you want to know more, just have a look at the RFC 826. FrameIP.com also seems to be a good starting point.
Our target is to play the MitM, capture some traffic and understand why switched environments security is a fairy tale. You should read first this presentation on ARP attacks with arp-sk (french version).
This means we're about to alter the ARP table of a distant host (target) with fake IP-MAC value pairs to let target believe it's connected to resource whereas it's actually connected to sniff. But since packets are expected back from resource to target, we also have to let resource believe it's connected to target, whereas it's actually connected to sniff.
To do so, we'll have to :
| Ethernet Frame (or "Link Layer") | arp-sk option | |
|---|---|---|
| SRC MAC | MAC address of host sending the request | -s (can be used to specify either MAC / IP / host) |
| SRC IP / host | (not used) | |
| DST MAC | broadcast : ff:ff:ff:ff:ff:ff | -d (can be used to specify either MAC / IP / host) |
| DST IP / host | (not used) | |
| ARP message | arp-sk option | |
| Sender MAC | MAC address of host sending the request | -S :MACxx:xx:xx:xx:xx:xx |
| Sender IP | IP address of host sending the request | -Sxxx:xxx:xxx:xxx |
| Target MAC | 00:00:00:00:00:00 | -D :MACxx:xx:xx:xx:xx:xx |
| Target IP | IP address of host receiving the request | -D xxx:xxx:xxx:xxx |
arp-sk -w -d host -s MAC -S IP -c 1
To perform a DoS :
To perform a MitM attack :
| When sending ... to remote host | Reply should be ... |
|---|---|
| TCP SYN (to open port) | TCP SYN/ACK |
| TCP SYN (to closed port) | TCP RST (ACK) |
| TCP ACK | TCP RST (ACK) |
| TCP DATA | TCP RST (ACK) |
| TCP RST | no response |
| TCP NULL | TCP RST (ACK) |
| ICMP Echo_Request | ICMP Echo_Reply |
| ICMP TS_Request | ICMP TS_Reply |
| UDP pkt (to open port) | protocol dependent |
| UPD pkt (to closed port) | ICMP Port Unreachable |
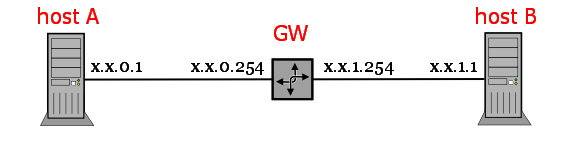
The GNU/Linux command route is now obsolete. Use ip route instead.
| SRC | DST | |
|---|---|---|
| IP | x.x.0.1 | x.x.1.1 |
| MAC | MAC of x.x.0.1 | MAC of GW x.x.0.254 |
| SRC | DST | |
|---|---|---|
| IP | x.x.0.1 | x.x.1.1 |
| MAC | MAC of x.x.1.254 | MAC of GW x.x.1.1 |
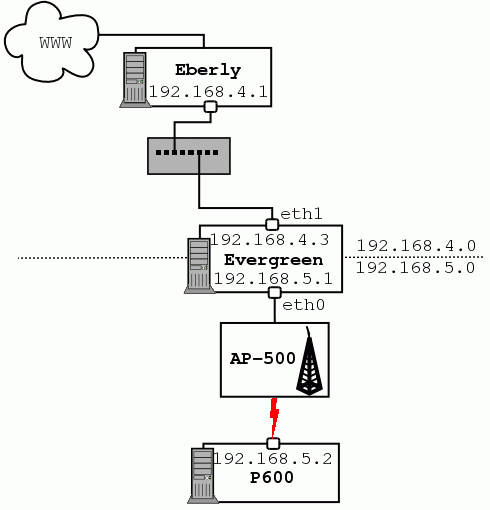
route add -net 192.168.5.0 netmask 255.255.255.0 gw 192.168.5.1 eth0
route add -net 192.168.4.0 netmask 255.255.255.0 gw 192.168.4.3 eth1
so that the kernel knows where to send packets.
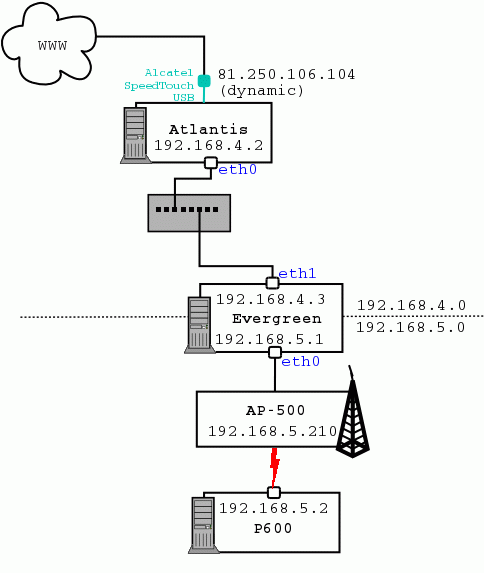
route add default gw 192.168.4.2 eth1
Explanations:-net 0.0.0.0 netmask 0.0.0.0. It means all the networks, whatever netmask they have, which matches with Internet. It's also to specify to apply this route whenever none of the others routes match.echo 1 > /proc/sys/net/ipv4/ip_forward
Running this on the router side will overwrite the existing /proc/sys/net/ipv4/ip_forward file and simply write a 1 inside.
ifconfig wlan1 down hw ether 00:15:AF:99:3E:27 && ifup wlan1
As this is a software hack, the real MAC address will be restored the next time the interface will be "re-discovered" by the kernel : reboot or reload of the kernel module.
allow-hotplug eth0
iface eth0 inet dhcp
allow-hotplug eth0
iface eth0 inet dhcp
	hwaddress ether B0:0B:50:00:00:02
2: eth0: <BROADCAST,MULTICAST,UP,LOWER_UP> mtu 1500 qdisc pfifo_fast state UP mode DEFAULT group default qlen 1000
link/ether b0:0b:50:00:00:02 brd ff:ff:ff:ff:ff:ff
And it also survives a reboot
It's pretty likely that utilities listed above are not available, but there are still some hacks to try
import socket
s=socket.socket()
s.connect(('12.34.56.78', 8888))
s.close()
ConnectionRefusedError: [Errno 111] Connection refused
socket.error: [Errno 113] No route to host
import http
conn = http.client.HTTPConnection('12.34.56.78:8888')
conn.request('GET', '/')
response = conn.getresponse().read()
print(response)
>>> conn.request()
	Traceback (most recent call last):

	ConnectionRefusedError: [Errno 111] Connection refused
That sounds clear enough
https://stackoverflow.com/questions/18743962/python-send-udp-packet/62275967#62275967

import socket

UDP_IP = "10.27.25.129"
UDP_PORT = 123
MESSAGE = "hello world"

print("UDP target IP: %s" % UDP_IP)
print("UDP target port: %s" % UDP_PORT)
print("message: %s" % MESSAGE)

sock = socket.socket(socket.AF_INET, # Internet
                     socket.SOCK_DGRAM) # UDP
sock.sendto(MESSAGE.encode(), (UDP_IP, UDP_PORT))
0
bash: line 1: quooGai6Oi7a.com: Name or service not known
bash: line 1: /dev/tcp/quooGai6Oi7a.com/80: Invalid argument
1
124